Navigation 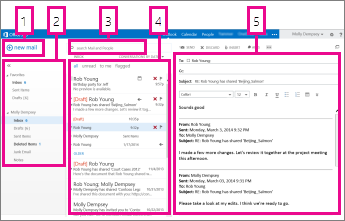
Select Mail from myapps, if not already displayed.
- New mail - click to create a new message
- Folder list
- Search box
- Message list
- Reading pane.
Sort - Click the Arrange by or Conversations by bar. A list of sorting options will display. Conversation View displays messages grouped by conversation topic.
The Inbox is split into 3 sections by default: Left = Folders, Middle=Message, Right = Reading pane
You can create additional own folders to organize your email and use Search to locate items in your mailbox.
Reply - Click on the Reply button in the toolbar or click on Reply in the message window.
Delete - Click the Delete button on the toolbar.
People / Contacts
College address book or global address list
Contact information for our students, staff and faculty.
3 ways to find our college global address or directory list:
- Click on To: in a new mail message window.
- Begin typing your contact's name in the To: field of a new message for automatic suggestions
- Select the People icon to create, view, and edit contacts, contact lists, and groups.

Contact Lists / Distribution Lists
From Outlook on the web choose People, select the arrow next to New contact, then select New Contact List, Name the list and add members.

-
Find my email addressYour Madison College email address will be your username followed by @madisoncollege.edu
-
Find out about Groups in Office 365 Shared workspace for email, conversations, files, and calendar events where group members can conveniently collaborate and quickly get stuff done.
Calendars
Select Calendar from Microsoft 365 app launcher (you may need to select 'all apps'). Choose view options such as Day, Work, Week or Month from the toolbar.

Meetings -Event or appointment that includes others. Use the Scheduling Assistant to check attendees schedule's to determine if they are free to attend your meeting.
Appointments - Events you add to your individual calendar - one time or scheduled to repeat on a regular basis.
Automatic Forwarding and Rules
There are 2 ways to send your student email to another account, if you choose to do so: Forwarding or Creating an Inbox Rule. To stop the email from going to the other account, you would need to turn off the forwarding or the rule.
Forwarding
Automatically forward all e-mail sent to your 365 student webmail account to another account.
- Login to your student email and click the Settings icon (Gear - upper right). Under Your app settings, click on Mail.

- Under Accounts - Forwarding, enter the e-mail address of the account you want all e-mail to be forwarded to.
- Select Keep a copy of forwarded messages to keep a copy of your forwarded messages in your student email account.
- Click Save to save your changes and start forwarding all incoming messages to another account.
Inbox Rules
You can create Inbox Rules to automatically perform specific actions on messages as they arrive, based on criteria you select. For example, you might automatically move all incoming email from a particular sender to a specific folder,set up an autoreply, or redirect email to another account.
email guides
How To
-
Video: Office 365 Outlook Web Appoverview of using Microsoft's Outlook Web App from O'Reilly
email - help from Microsoft
Tip: To get help right in the email window you're working in, click the help (?) icon on the toolbar.
Microsoft 365 app launcher

Click the app launcher icon at the top left of your college email to see all your Microsoft 365 apps and services. This menu provides easy access to your OneDrive and Office for the web, which allows you to create, edit, view files online.

-
Office 365 - FREE Microsoft Office for current studentsGet the full versions of Microsoft software for free while you are a current Madison College student
Focused Inbox
The Outlook Mobile App uses a focused inbox to help prioritize your emails. Be sure to check your Other tab as well to make sure you're not missing any important emails. If you'd like, you can toggle the focused inbox off within the Outlook mobile app settings.
- Microsoft Outlook for Mobile playlist - More videos from Microsoft
- Optimize the Outlook mobile app for your phone or tablet - Learn how to change your notification settings, add a calendar widget to your device, and more
Clutter
How to Turn Clutter off:
- Right click on the Clutter folder to see options
- Or Navigate to the email options by clicking on the gear icon on the right and selecting Mail - Options menu. Using the left-side navigation, expand Mail, expand Automatic Processing and select Clutter
- Uncheck the box for "Separate items identified as Clutter"
- Click Save.
- No further messages should be sent to this folder.
Get Help! Student Technology Hub
Contact Us
Additional Resources
